Click to go to:
Adding a Claim Task
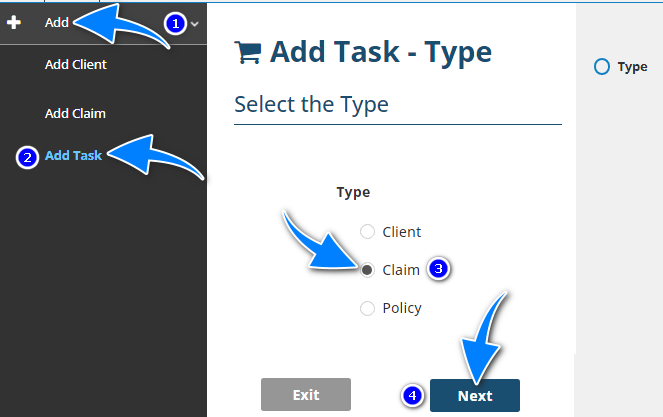
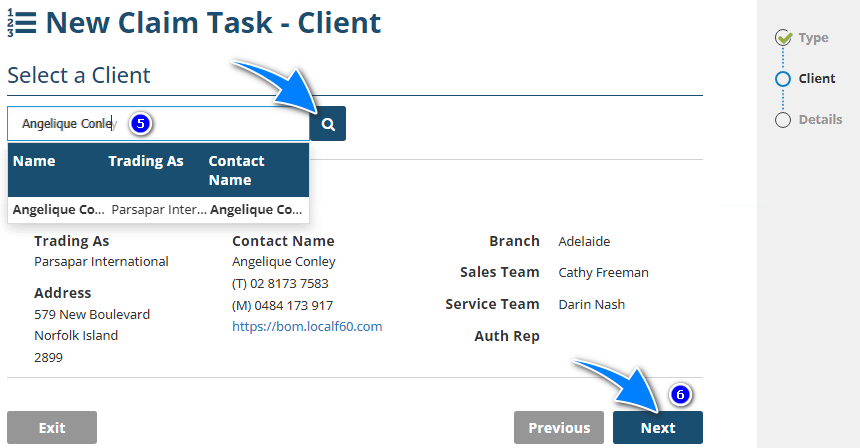
If you have permission to add a claim task, you can use the Add menu and select Add Task. This launches the Add Task wizard where it will ask what type of task you wish to create. Select Claim, then on the next page, select the client the task shall belong to, go into the Details page, select the Claim the task is for and complete the rest of the page.
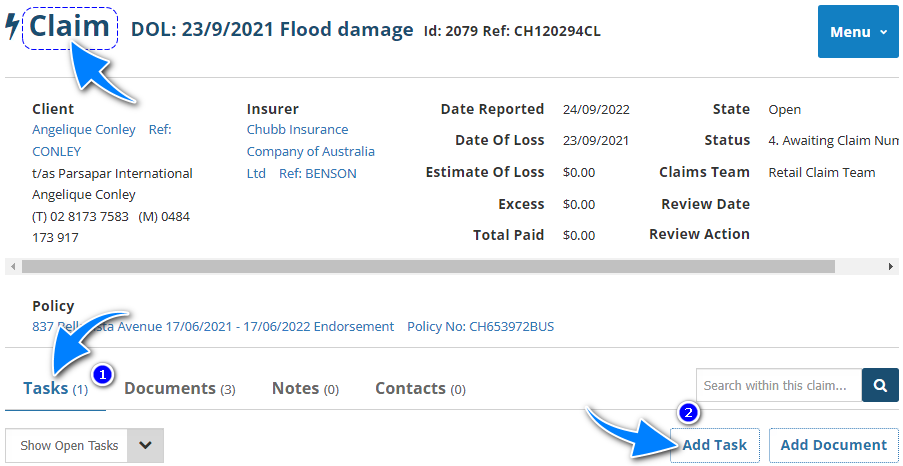
Alternatively, if you're already on the claim you wish to add a task to, go to the Tasks tab and select Add Task. This goes directly into the Details page of the New Claim Task wizard where you don't need to select the Claim.
Details page
The Details step is the last page of the New Claim Task wizard:
- Most of the fields on the pages are self-explanatory, however, we'll highlight fields that require further explanation.
- All fields marked with the text Required must be completed before saving the Claim Task.
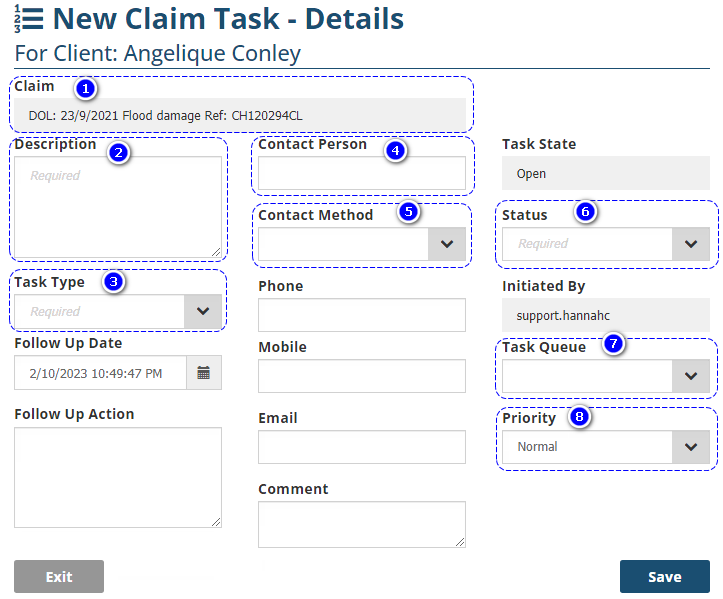
1. Claim - Selected by default when adding the task from the Claim, otherwise will need to be manually selected. Contains the Claim Description and Insurer Reference the task belongs to.
2. Description - Text entered in this field can be used to search for the Claim Task in the Search bar.
3. Task Type - INSIGHT has default options available such as Acknowledgement or Notification. However, the onsite Administrator can add/remove task types to suit the business' needs.
4. Follow Up Date - Determines when the task is captured by the Up To Date in the Open Tasks list.
5. Contact Person - This field is linked to the client's existing Contacts; however, you can enter any name into this field. When using an existing contact, you can auto-pull the stored phone, mobile and email details into the wizard.
6. Contact Method - If Phone, Mobile or Email is selected in this dropdown field, the respective field below will also become a mandatory field.
7. Status - INSIGHT has default options such as Not Started or Completed. However, the onsite Administrator can add/remove Status options to suit the business' needs.
8. Task Queue - Determines who will complete the task. Queues can be individual users or teams. They can also belong to the user logged in or to any other staff member/team listed in the Queue selection.
9. Priority - INSIGHT has default options such as Normal or High. However, the Administrator can add/remove Priority options to suit the business' needs.
IMPORTANT: Once all neccessary fields are complete, select Save to the create
 the Claim Task.
Editing a Claim Task
To edit a Claim Task, you must first locate the task & select Edit. There are several ways to locate a task, below are examples:
1. Use the search bar to search for the Task Description, go to the Tasks tab, locate the correct task and select Edit.
2. When in the client or claim, go to the Tasks tab, locate the task and select Edit.
3. When in the Open Tasks list, locate the task and select Edit.
IMPORTANT: After selecting Edit, make your changes and select Save when done. Closing a Claim Task
To close a Claim Task, locate the task and select Edit. From there, change the Status to Completed and select Save.
IMPORTANT: Changing the Status to Completed will change the State to Closed.
Was this article helpful?
That’s Great!
Thank you for your feedback
Sorry! We couldn't be helpful
Thank you for your feedback
Feedback sent
We appreciate your effort and will try to fix the article