Click to go to:
Introduction
My Lists are a collection of lists used to track your workflow in regards to tasking, renewals, payments & claims. They are separate from the Reports feature though it can be used hand-in-hand with generating reports. The content displayed in my lists depends on your choices in My Customisations and the permissions level you have. The lists consist of:
 Open Tasks Open Tasks | Insurer Payments Due |
| Policies Due for Renewal | Unposted Transactions |
| Client Payments Due | Open Claims |
 QUICK TIP: Refer to the article My Customisations to learn more about
customising My Lists.
Where to find My Lists?
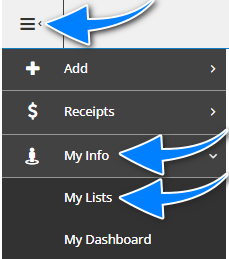 | To access My Lists, refer to the Menu, select My Info, then My Lists. |
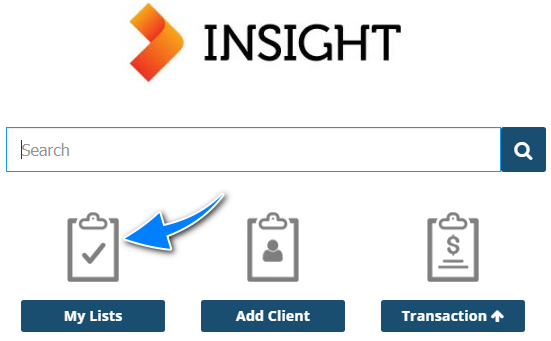 | If you are on the Home page, you can also use the My Lists shortcut. |
Open Tasks
 When viewing tasks using the Open Tasks list, the idea is to filter the list (if needed), select View on the first task of the list, review the task details and complete each task from start to finish.
 Once a task is complete or when you need to update task details, select Edit and make the necessary changes. For example, when a task is complete, change the Status to Complete.
 When done updating the task, you can move on to the next task by selecting Next Task.
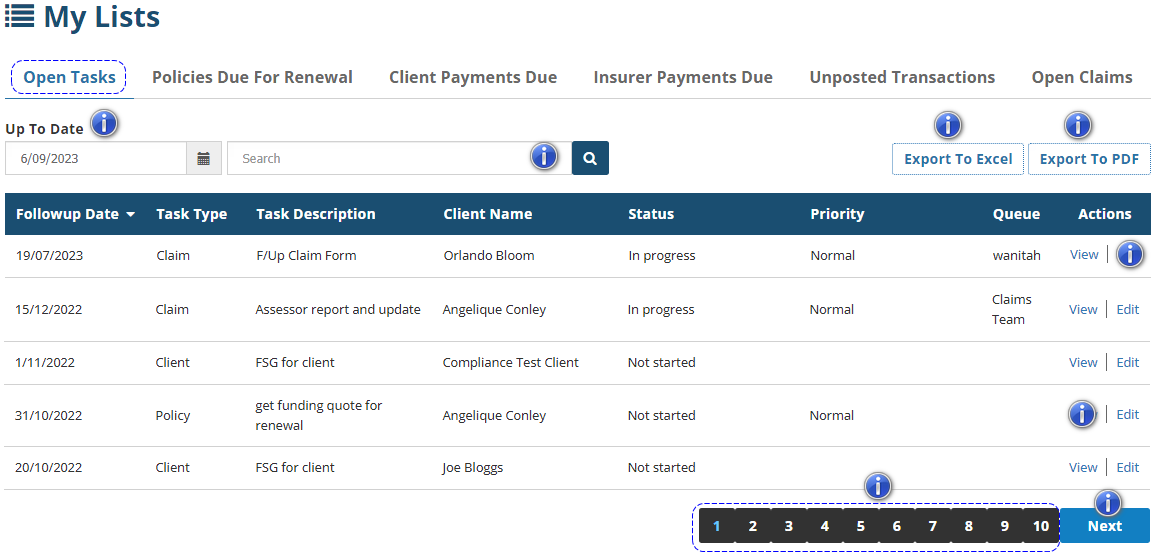
 Up To Date: Determines the “up to date” of tasks shown on the list. The date displayed will depend on the chosen setting in My Customisations, but you can also manually change this on the list itself.
Search bar: You can refine the list by filtering with the Search bar. For example, you can filter the list to only see Hannah’s task by entering Hannah into the Search bar.
Export to Excel: Once all filtering is done (if needed), you can export the list to an Excel format and download the list to your computer.
Export to PDF: Once all filtering is done (if needed), you can export the list to a PDF format and download the list to your computer.
View: Selecting View will take you to the task wizard. From there, you can view task details and choose to edit them if needed.
Edit: Selecting Edit will take you straight into the “edit mode” of the task wizard. From there, you can update task details, such as the Status.
Page Numbers: This indicates which page of the list you are currently viewing and how many pages make up the list.
Previous or Next: This indicates which page of the list you are currently viewing and how many pages make up the list.
Policies Due for Renewal
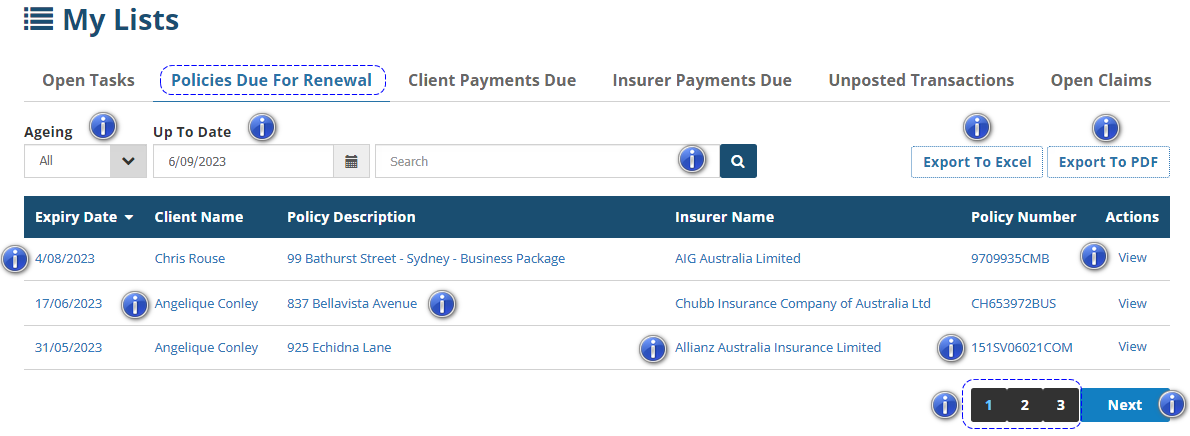
Ageing: Used to filter the list to show all policies based on chosen Up To Date, all overdue renewals, policies due based on the present date and policies due in 2-7 days, 8-14 days, 15-30 days & 31-60 days from the present date.
Up To Date: Determines the “up to date” of tasks shown on the list. The date displayed will depend on the chosen setting in My Customisations, but you can also manually change this on the list itself.
Search bar: You can refine the list by searching for keywords with the Search bar. For example, you can search for certain policy numbers or a client’s name.
Export to Excel: Once all filtering is done (if needed), you can export the list to an Excel format and download the list to your computer.
Export to PDF: Once all filtering is done (if needed), you can export the list to a PDF format and download the list to your computer.
Expiry Date: Takes you to the Policy level.
Client Name: Takes you to the Client profile.
Policy Description: Takes you to the Policy level.
Insurer Name: Takes you to the Insurer profile.
Policy Number: Takes you to the Policy level.
View: Takes you to the Policy level. From there, you can proceed with renewing the policy if applicable.
Page Numbers: This indicates which page of the list you are currently viewing and how many pages make up the list.
Previous or Next: Depending on where you are on the list, use these buttons to move through the pages of the list one page at a time.
Client Payments Due
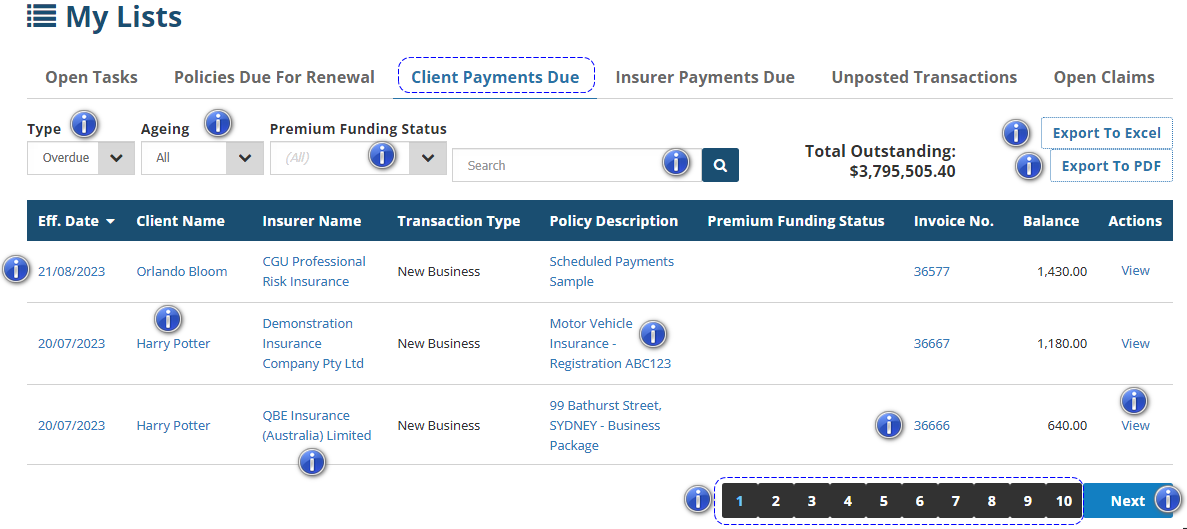
Type: Used to filter the list to show overdue invoices for client payment based on the chosen Ageing filter or all invoices not due for client payment based on the present date.
 Ageing: Used to filter the list to show all invoices due for client payment or invoices that are due for client payment in 0-7 days, 7-14 days, 15-30 days, 31-60 days, 61-90 days & 90+ days from the present date.
 Premium Funding Status: Used to filter the list to show all invoices (funded & not funded) or invoices with Approved, Finalised, Submitted, Unapproved Funding Statuses.
Search bar: You can refine the list by searching for keywords with the Search bar. For example, you can search for certain policy numbers or a client’s name.
Export to Excel: Once all filtering is done (if needed), you can export the list to an Excel format and download the list to your computer.
Export to PDF: Once all filtering is done (if needed), you can export the list to a PDF format and download the list to your computer.
Eff. Date: Takes you to the Policy Transaction level. From there, you can view the Premiums, Schedule or go into the wizard.
Client Name: Takes you to the Client profile.
Insurer Name: Takes you to the Insurer profile.
Policy Description: Takes you to the Policy level.
Invoice Number: Takes you to the Policy Transaction level.
View: Takes you to the Policy Transaction level.
Page Numbers: This indicates which page of the list you are currently viewing and how many pages make up the list.
Previous or Next: Depending on where you are on the list, use these buttons to move through the pages of the list one page at a time.
Insurer Payments Due
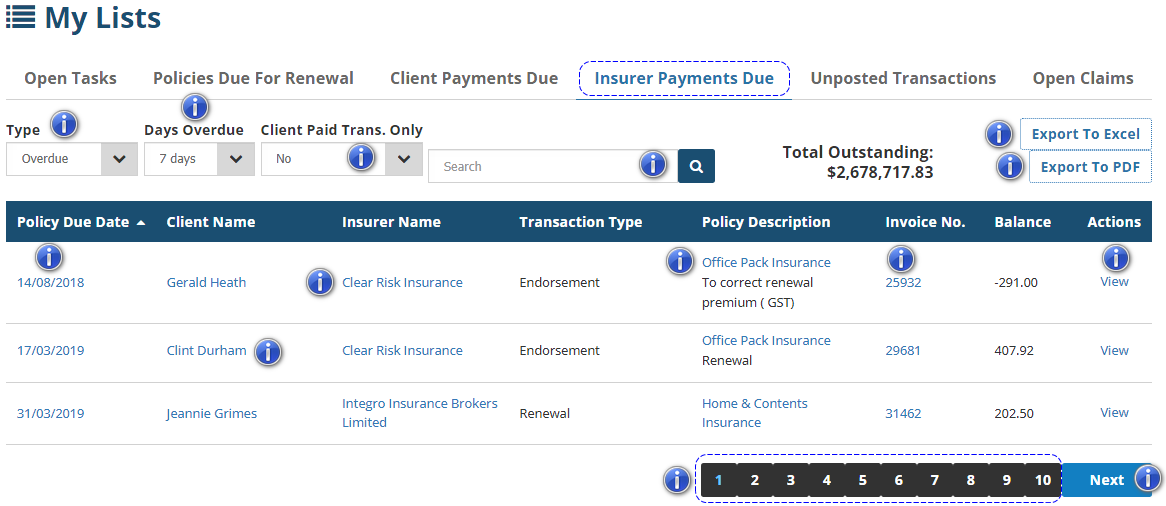
Type: Used to filter the list to show overdue invoices for insurer payment based on the chosen Days Overdue filter or all invoices not due for insurer payment based on the present date.
Days Overdue: Used to filter the list to show all invoices that are due for insurer payment or show invoices due for insurer payment in 7, 14, 30, 60, 90 & 120 days from the present date.
Client Paid Trans. Only: Used to filter the list to show invoices that have been paid by the client and not paid by the client.
Search bar: You can refine the list by searching for keywords with the Search bar. For example, you can search for certain policy numbers or a client’s name.
Export to Excel: Once all filtering is done (if needed), you can export the list to an Excel format and download the list to your computer.
Export to PDF: Once all filtering is done (if needed), you can export the list to a PDF format and download the list to your computer.
Policy Due Date: Takes you to the Policy Transaction level. From there, you can view the Premiums, Schedule or go into the wizard.
Client Name: Takes you to the Client profile.
Insurer Name: Takes you to the Insurer profile.
Policy Description: Takes you to the Policy level.
Invoice Number: Takes you to the Policy Transaction level.
View: Takes you to the Policy Transaction level.
Page Numbers: This indicates which page of the list you are currently viewing and how many pages make up the list.
Previous or Next: Depending on where you are on the list, use these buttons to move through the pages of the list one page at a time.
Unposted Transactions
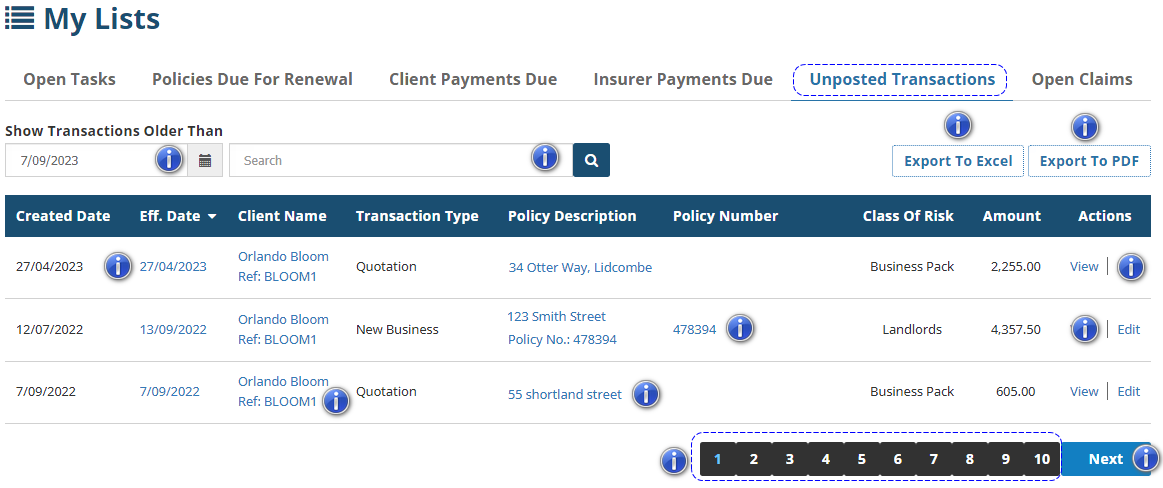
Show Transactions Older Than: Filters the list to display unposted transactions created before your selected date.
Search bar: You can refine the list by searching for keywords with the Search bar. For example, you can search for certain policy numbers or a client’s name.
Export to Excel: Once all filtering is done (if needed), you can export the list to an Excel format and download the list to your computer.
Export to PDF: Once all filtering is done (if needed), you can export the list to a PDF format and download the list to your computer.
Eff. Date: Takes you to the Policy Transaction level. From there, you can view the Premiums, Schedule or go into the wizard.
Client Name: Takes you to the Client profile.
Policy Description: Takes you to the Policy level.
Policy Number: Takes you to the Policy Transaction level.
View: Takes you to the Policy Transaction level.
 Edit: Takes you into the Transaction Wizard where you can make changes and post the transaction, if applicable.
Page Numbers: This indicates which page of the list you are currently viewing and how many pages make up the list.
Previous or Next: Depending on where you are on the list, use these buttons to move through the pages of the list one page at a time.
Open Claims
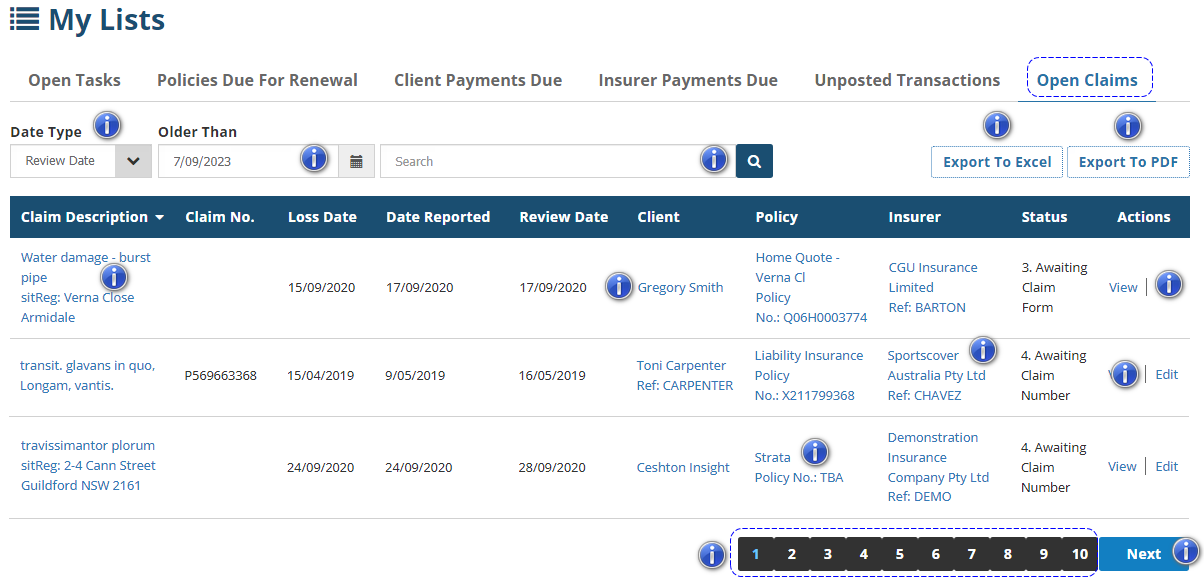
Date Type: Used to filter the list to show claims by their Review Date, Lost Date or Date Reported.
Older Than: Works with the Date Type filter & used to filter the list to show claim before your selected date.
Search bar: You can refine the list by searching for keywords with the Search bar. For example, you can search for certain claim numbers or a client’s name.
Export to Excel: Once all filtering is done (if needed), you can export the list to an Excel format and download the list to your computer.
Export to PDF: Once all filtering is done (if needed), you can export the list to a PDF format and download the list to your computer.
Claim Description: Takes you to the Claim level. From there, you can go into the Claim Wizard, add a claim task or add a claim document.
Client: Takes you to the Client profile.
Policy: Takes you to the Policy level.
Insurer: Takes you to the Insurer profile.
Invoice Number: Takes you to the Policy Transaction level.
View: Takes you into the Claim wizard.
 Edit: Takes you into the 'edit mode' of the Claim wizard.
Page Numbers: This indicates which page of the list you are currently viewing and how many pages make up the list.
Previous or Next: Depending on where you are on the list, use these buttons to move through the pages of the list one page at a time.
Was this article helpful?
That’s Great!
Thank you for your feedback
Sorry! We couldn't be helpful
Thank you for your feedback
Feedback sent
We appreciate your effort and will try to fix the article