Introduction
Transaction wizards are tailored to serve the purpose of each transaction type, however, they do share generic & common pages regardless of the transaction type. These common pages are:
 | Policy Summary |  | AR Premiums |
 | Policy Details |  | Compliance |
 | Schedule |  | Document or Invoice Generation |
 | Invoice Premiums |  | Summary |
Document or Invoice Generation
This page behaves differently for financial transactions (generates an invoice) and non-financial transactions (does not generate an invoice). When generating documents, select the checkbox beside your desired documents, select your preferred output method and finalise the wizard (ie: select Post to Accounts or Create Documents).
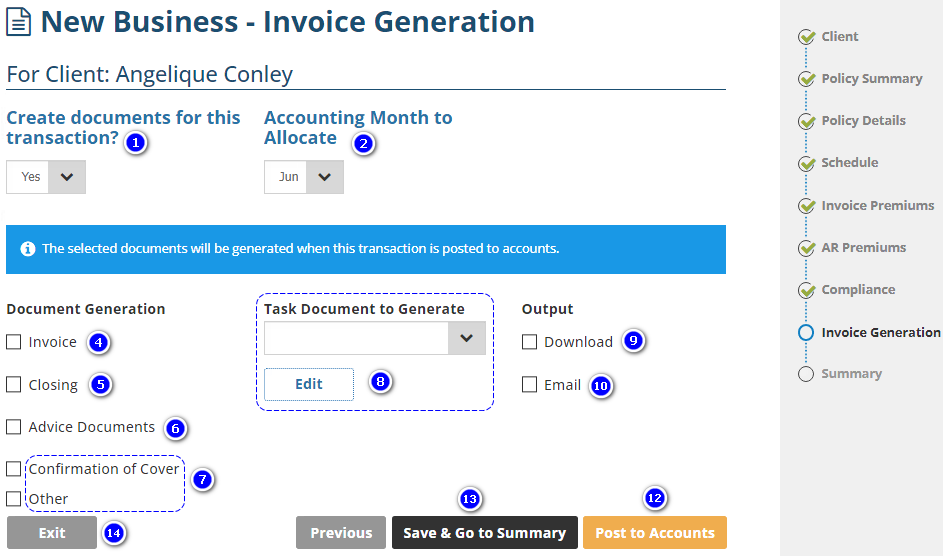
Sample of a Financial Transaction
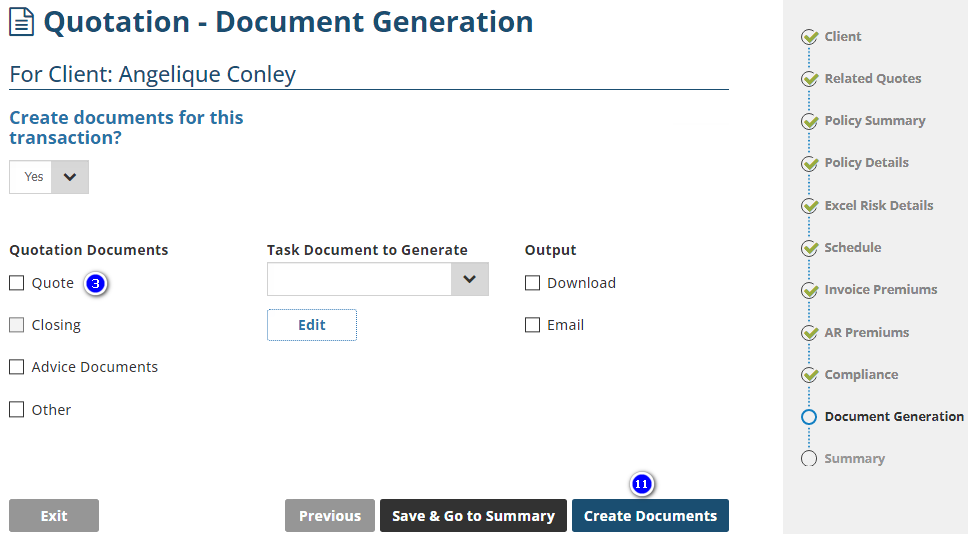
Sample of a Non-financial Transaction
1. Creating Documents for this transaction? - Defaults to Yes but can be updated to No. Both options allow you to finalise the wizard & post the transaction. Before choosing No & selecting Post to Accounts, check your business rules & practises concerning posting to accounts without generating an invoice/documents.
- Yes: displays document generation options in the bottom half of the page.
- No: hides the document generation options.
2. Accounting Month to Allocate - Defaults to the current month. Other month options may be available if they have not been closed by accounting. Always check your business rules & practises concerning posting to accounts using a prior month.
3. Quote - Select this check box to generate the quotation document for the client displaying the amount payable.
- Include Commission: if configured in your document templates, displays the commission earned for this transaction on the quote.
4. Invoice - Select this check box to generate the invoice document for the client displaying the amount payable & the payment methods. Selecting this also displays 2 additional options:
- Include Commission: if configured in your document templates, displays the commission earned for this transaction on the invoice.
- Include Background Funding: when enabled for your business, selecting this displays an option to choose a funder or can be set to a pre-selected funder. The chosen funder's background funding details will be included on the invoice.
5. Closing - Select this check box to generate the document for the insurer requesting binding of cover.
6. Advice Documents - Select this check box to display all compliance documents enabled & uploaded on the previous Compliance page. From there, select the checkbox beside the compliance documents you wish to generate.
7. Confirmation of Cover & Other - Check with your business rules & practises to confirm if these documents are used by your business. When in use, select the relevant checkbox to generate the document.
8. Task Documents to Generate & Edit - displays policy transaction document templates uploaded by your Administrator. Check with your business rules & practises to confirm how and when to use these documents. If in use, select the document, then select Edit to launch Word, fill in the template, save your changes and return to INSIGHT.
9. Download - Select this checkbox to generate your chosen documents as PDF documents on your computer.
10. Email - Select this checkbox to generate your chosen documents as PDF document email attachments. You'll have additional options to:
- Choose an email template for the body of your email
- Attach additional documents to the email from your computer
- Choose a sendee for the email from the saved client contacts in INSIGHT
NOTE: If your desired sendee is not saved as a client contact in INSIGHT, you can manually add them directly to the email when its generated.
11. Create Documents - available for non-financial transactions, such as a Quotation. Selecting this generates your chosen documents and takes you to the Summary page of the wizard.
12. Post to Accounts - available for financial transactions, such as a New Business. Selecting this generates your chosen documents, creates the debt/credit on the client's account, locks the wizard so that no further changes can be made and takes you to the Summary page of the wizard.
13. Save & Go to Summary - Selecting this saves the work you've done and takes you to the Summary page of the wizard. At this stage, you can return to prior pages of the wizard and continue to make changes.
14. Exit - Selecting this displays the following options:
- Save: saves the work you've done and takes you away from the wizard.
- Don't Save: does NOT save the work you've done and takes you away from the wizard.
- Cancel: returns you to the wizard where you can continue to make changes to the wizard.
Was this article helpful?
That’s Great!
Thank you for your feedback
Sorry! We couldn't be helpful
Thank you for your feedback
Feedback sent
We appreciate your effort and will try to fix the article