| Version 1.4 | 3 April 2020 |  |
Table of Contents |
| Overview | Refunding the Premium FunderTroubleshooting |
Introduction |
The Client Payments (Refunds) Wizard in INSIGHT will allow the following:
- Ability to select client refund and select multiple refund in the one payment for the client.
- Review a summary of the payments being made prior to posting
- Download remittance advices as PDF and Excel
- Ability to email remittance advices from within the wizard before the payment is posted
- Exporting of the Payment Bank File Australia Only) containing the selected transactions from within the payment wizard
- Show a Payment Summary page that lists the payments and the status of the advice email each payee is sent
The intended audience for this document is those staff within each organisation who have responsibility to process and manage payments and accounting records; and internal or external staff that are required to have knowledge on accounting functions of INSIGHT. Readers are advised to refer to the INSIGHT Online Help for additional information that may be available.
Business Rules |
1. The client account has a credit invoice to pay
2. If a policy is marked as “funded” the user can choose if it is paid to the funder or to the client.
3. Co-Clients do not have an email address field and are unable to receive a remittance via email – remember to download a PDF remittance advice if needed.
4. For payments to be included in a batch ABA file (export payment file), there must be bank details on the client profile.
Overview |
Multiple Payments
INSIGHT allows you to refund more than one credit sitting against the client’s account.
Partial Payment
- You can modify the amount of the refund they wish to pay to the client.
- You can select more than one credit at time of payment.

Payment Summary
Users will have the option to download a Payment Summary (in Excel format) before posting the client refund payment – this allows for the ability to review all payments before posting to accounts. The Include in Download check boxes determines the client refund payments to be included in the Payment Summary.
 NOTE: Depending on the browser the user is using, a pop-up will appear in the bottom of the screen with prompts to open the file, save the file or to cancel the pop-up.
Enter client bank details within the Wizard (Australia ONLY)
The bank details displayed in the Wizard are brought in from the Client profile.
- If the Client profile contains bank details, these will be displayed in fields of this section.
- If the Client profile does not contain bank details, this section will display blank fields.
If bank details are updated in this section, they will NOT transfer to the Client profile. A reminder message will display as follows:

If the bank details entered in this section are to be used for regular client refunds, these details need to be updated within the Client profile. From there, the bank details will be brought into this section automatically from the Client profile.
Export Bank Payment File included in Wizard (Australia ONLY)
The selection of transactions to be included in the Bank Payment File (Australia Only) are now included with in the Client payment wizard.
Process |
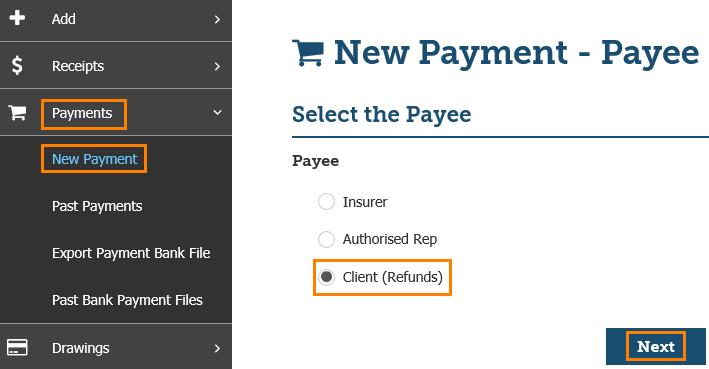
1. In the left-hand menu, select Payments and New Payment.
2. Select Client (Refunds) and Next.
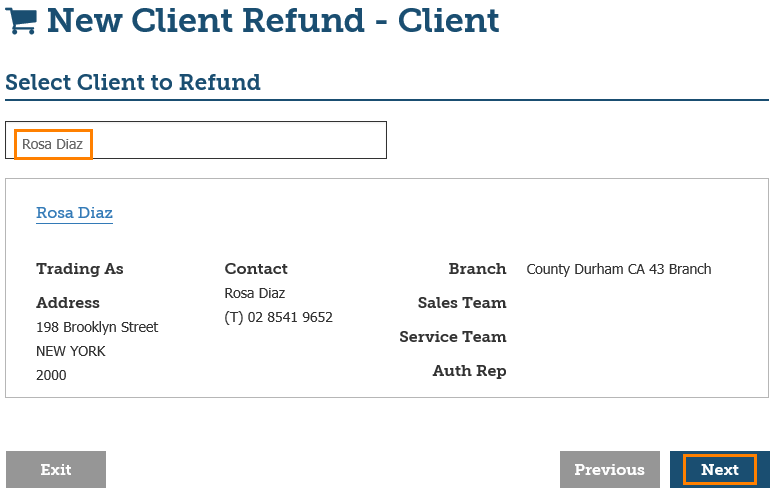
3. Enter the name of the client you wish to refund, select their profile and select Next.
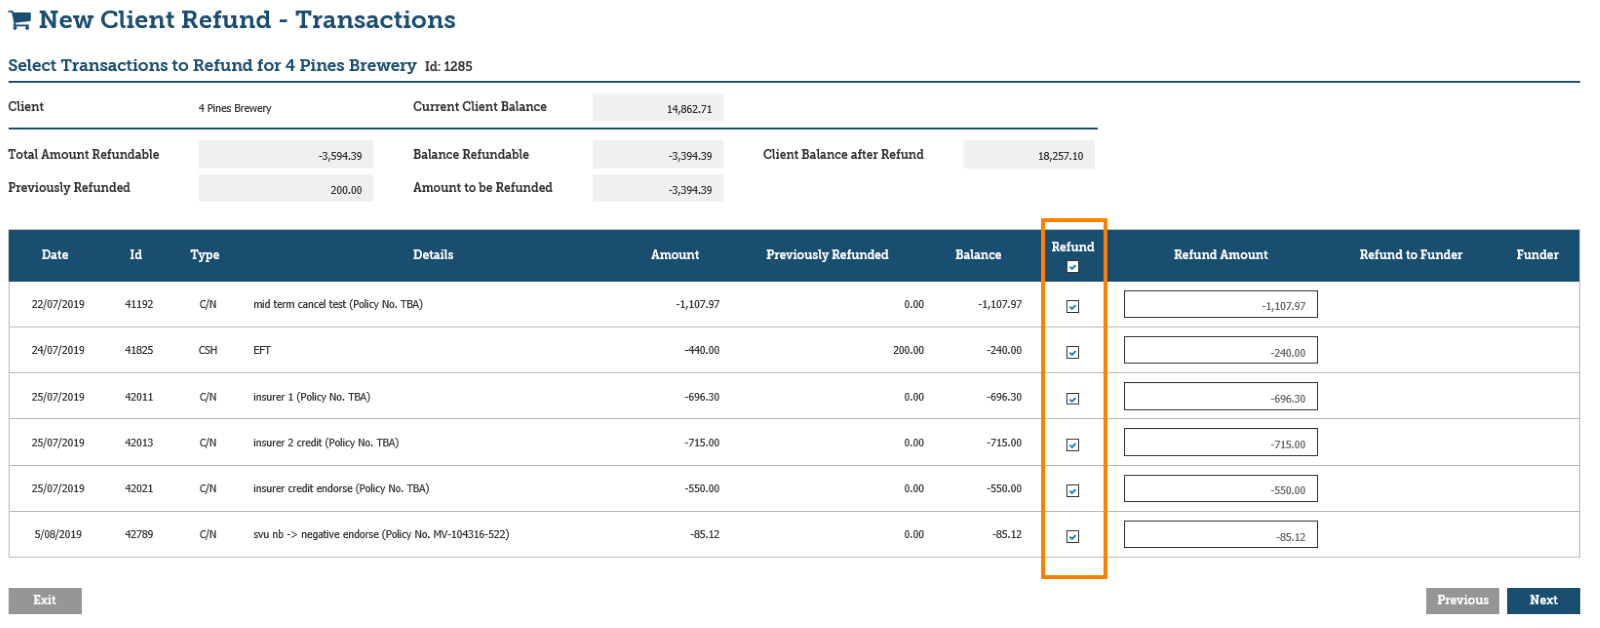
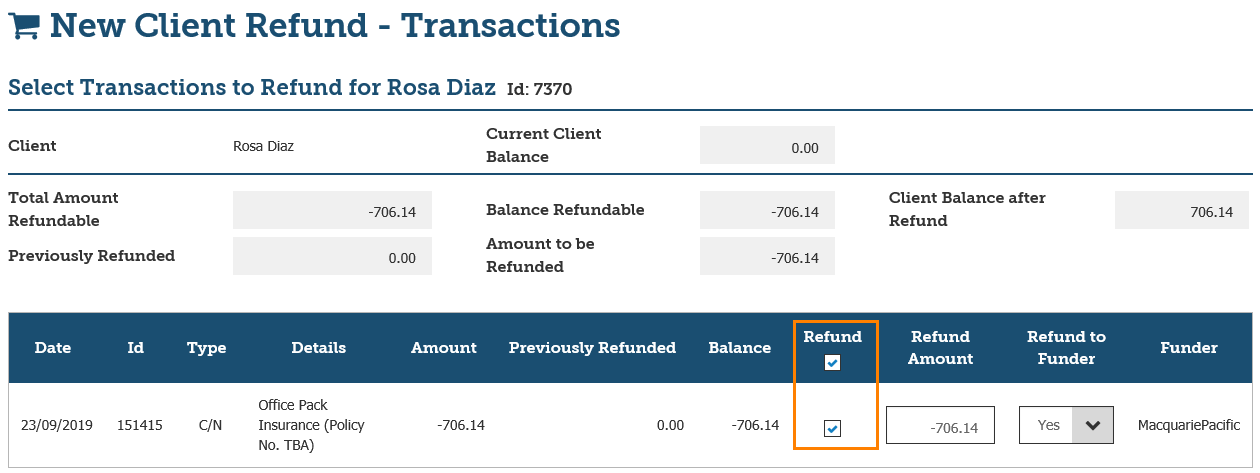
4. Review and select the amounts to be included in the Client refund payment and select Next.
NOTE: By default, all refunds will be pre-selected.
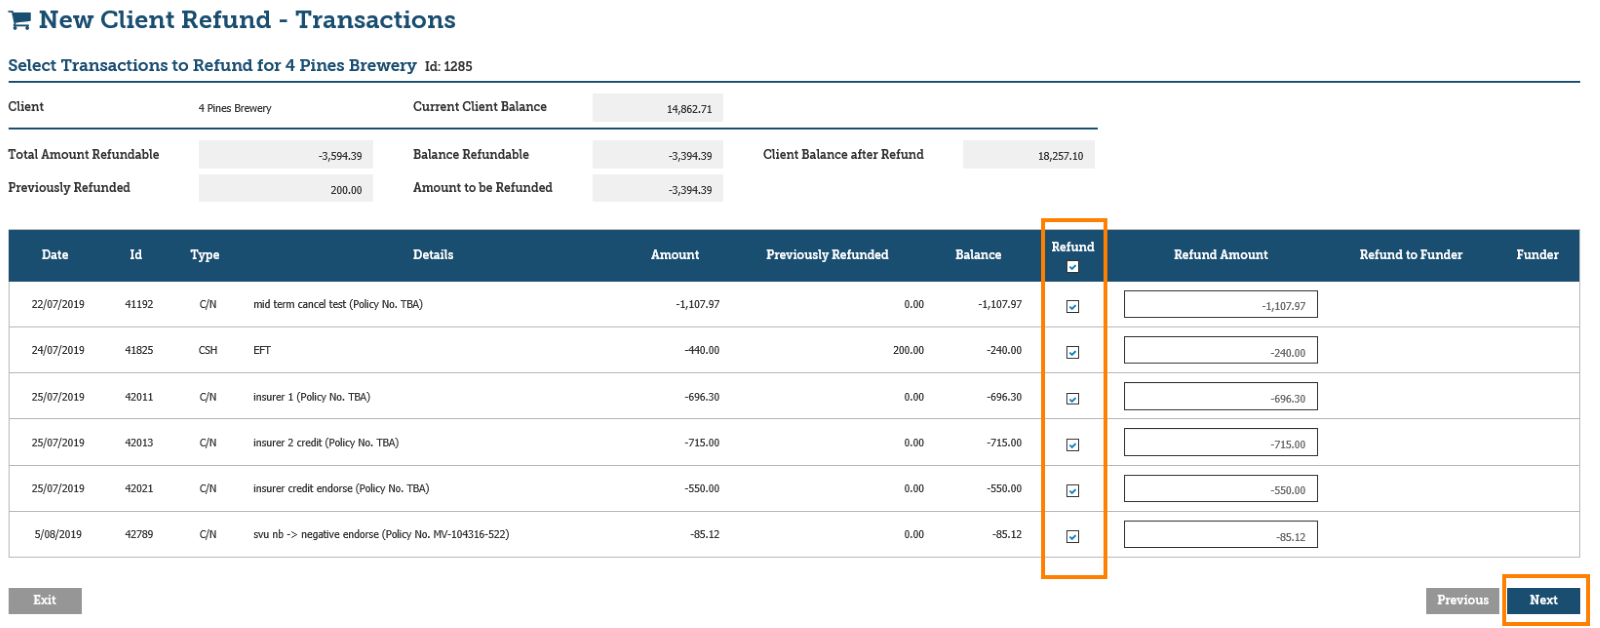
NOTE: As the refunds are selected for Client payment, the balances in the below fields will automatically update.

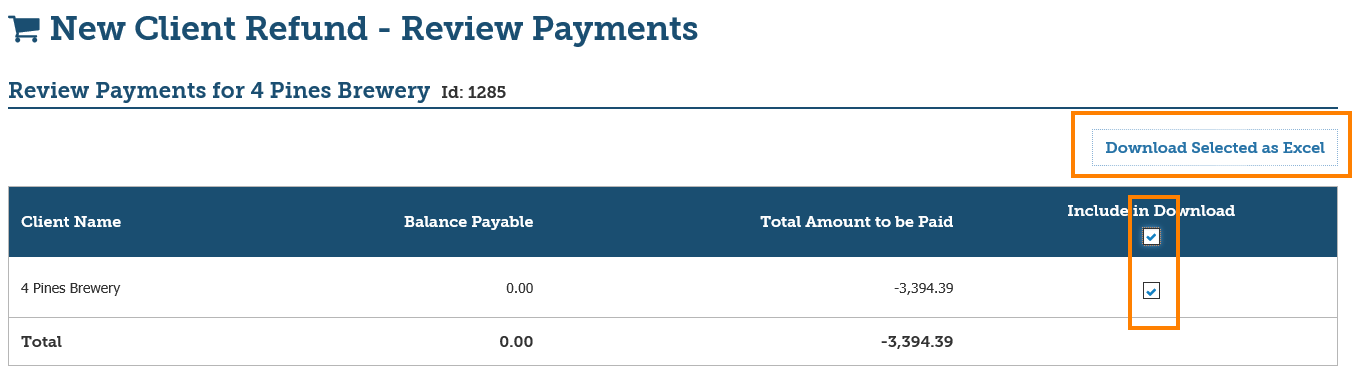
5. Review the Payment Summary, then select Next.
NOTE: If the list needs to be printed PRIOR to making the Client payment (prior to posting to accounts), select the check box for Include in Download and select Download Selected as Excel. Depending on the browser the user is using, a pop-up will appear in the bottom of the screen with prompts to open the file, save the file or to cancel the pop-up.

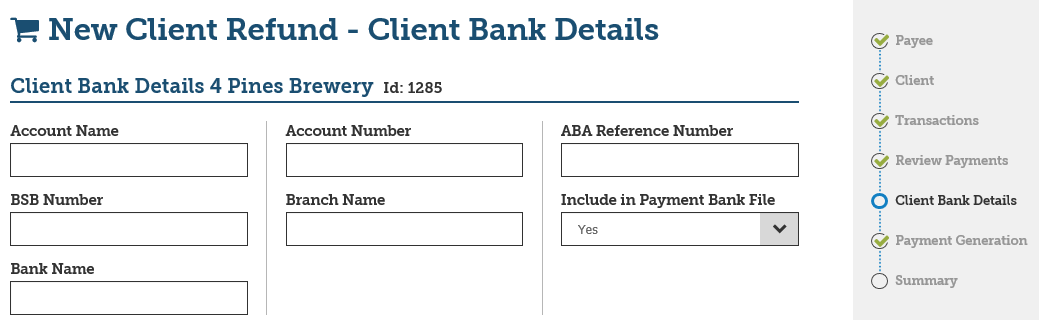
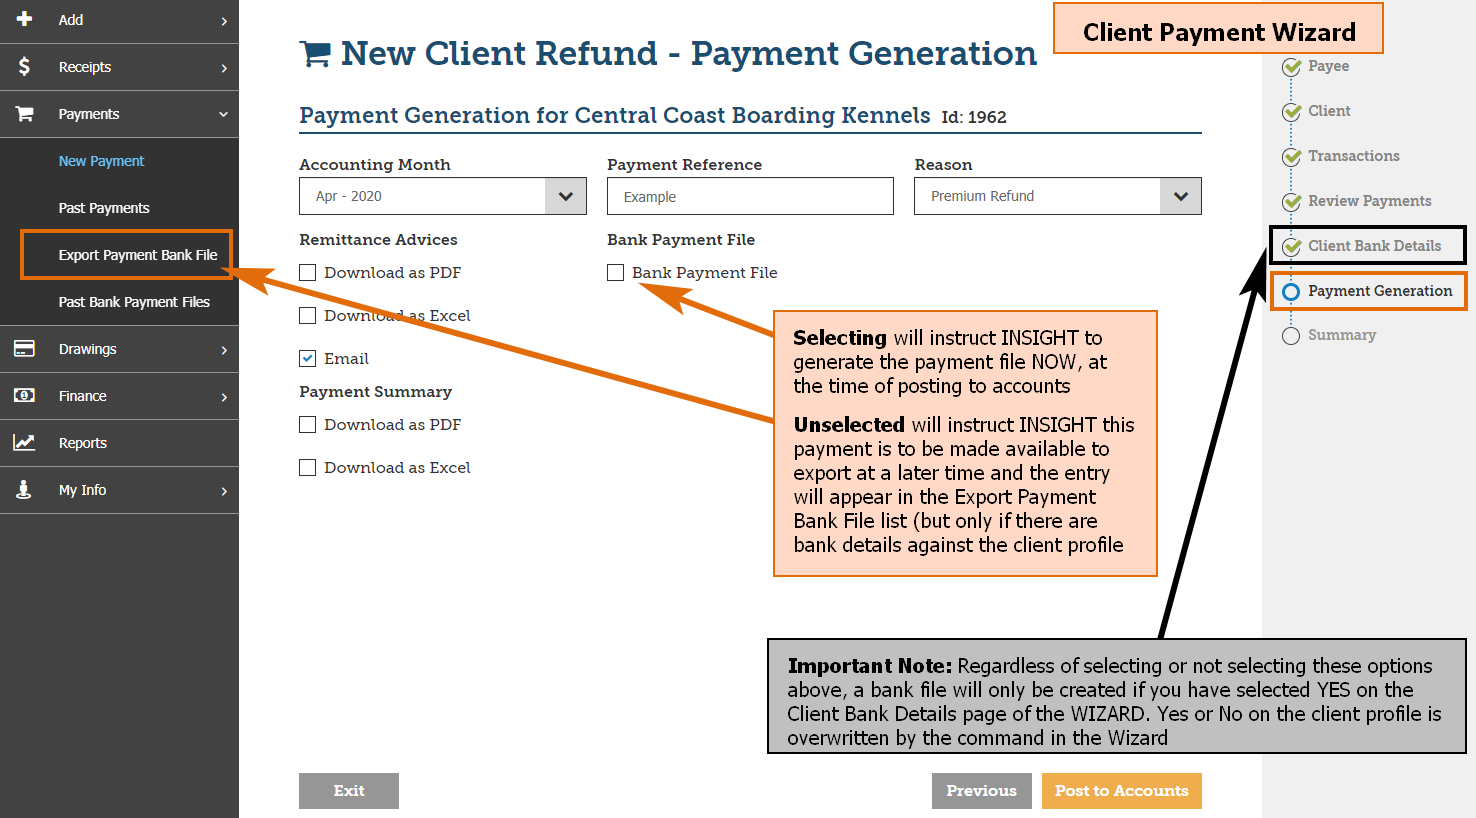
6. Review and update (if applicable) the bank details and the Include in Payment Bank File setting, then select Next. Refer to notes in Section 3.3.

 NOTE: Entering bank details here will not update the client record. INSIGHT will provide the following message to inform the user.
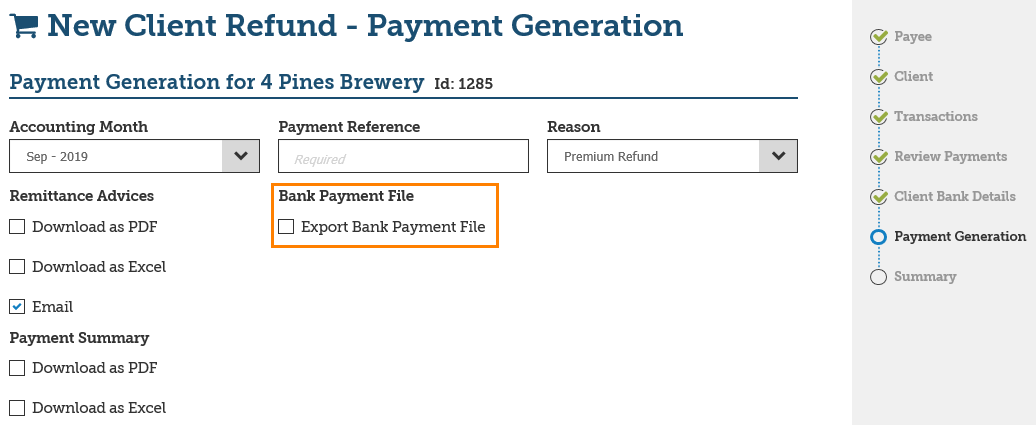
7. Enter a Payment Reference, then select a Reason for the client refund payment.
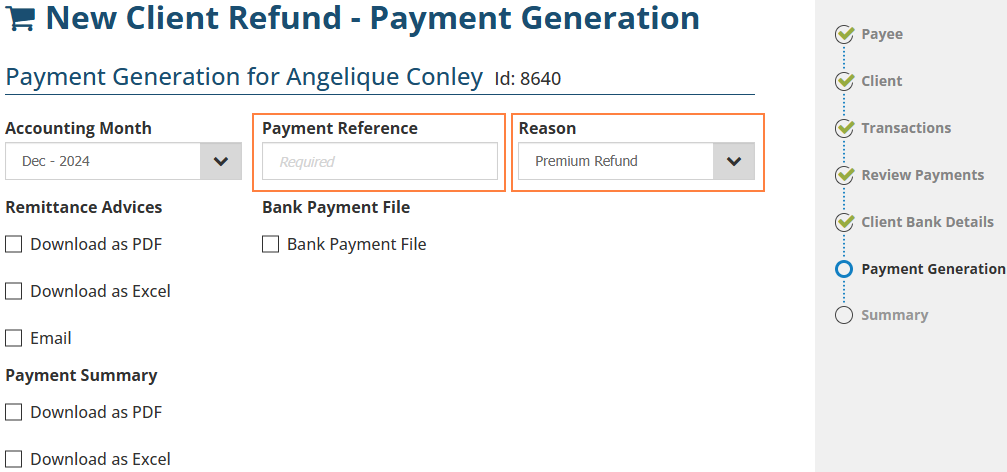
8. (If applicable) Select the desired method of download for the Remittance Advices.
 NOTE:
- Email is selected by default but can be unselected if needed
- Clients do not have email addresses, so you must download a PDF or Excel advice.
9. (If applicable) Select the desired method of download for the Payment Summary.
NOTE: The download is initiated once the Client payment is Post to Accounts.

10. (If applicable) Select Export Bank Payment file to also download the Bank Payment File (ABA file) for these Client payments.

11. Select Post to Accounts, then Yes to the confirmation message.
12. Open or Save the downloaded Remittance Advices, Payment Summaries or Bank Payment File.
 NOTE: If the Remittance Advice was emailed to the Client, a confirmation of whether the email was sent or not can be found in last page of the Wizard.

 NOTE: Co-Clients do not have email addresses, so you must download a PDF or Excel advice.
13. Select Finish to exit out of the Wizard or Make Another Payment to return to the start of the wizard.
Refunding the Premium Funder |
Once an invoice is marked as premium funded and paid, the policy can be cancelled or endorsed in a way that results to a return premium – this results in monies that need to be refunded to the Premium Funder. An invoice is paid via premium funding by either manually or electronically receipting the monies into INSIGHT. This section will cover how to refund premium funded monies to the Funder.
Refund to Funder Process
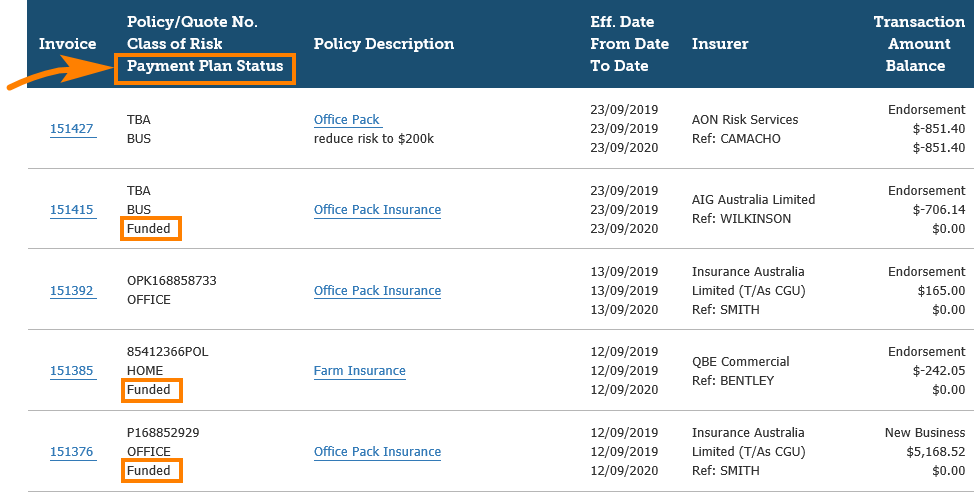
First, confirm the invoice is paid via premium funding.This can be done by checking the Payment Plan Status of the transaction:

Second, confirm that INSIGHT has the correct Funder back details in Configuration – refer to the User Guide for Premium Funding.
1. Select Payments, New Payment, Client (Refunds) and Next .
2. Enter the client name, select the correct client and select Next.
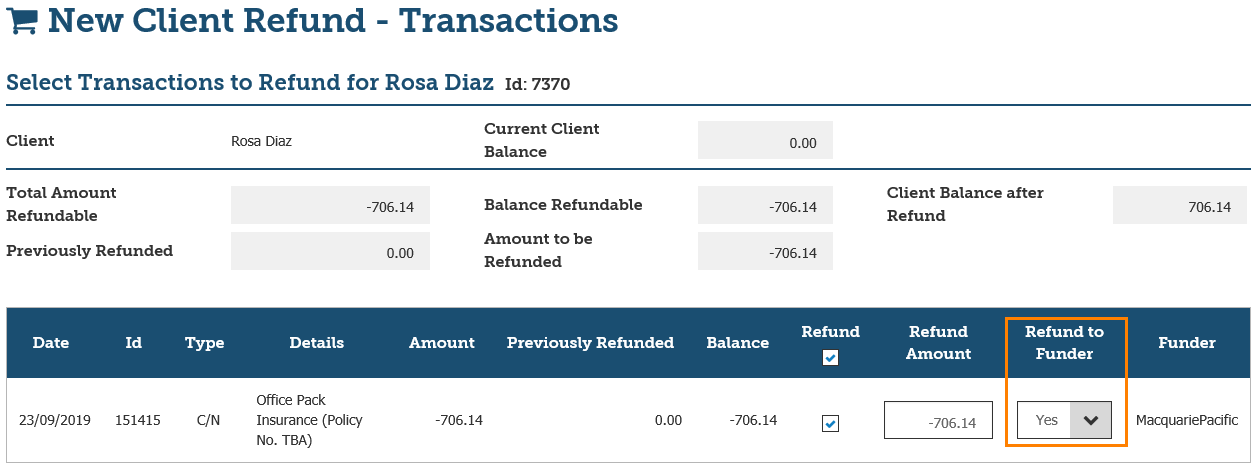
3. Select the amount(s) to refund .
4. In the Refund to Funder field, select Yes.
NOTE: If the funding receipt has NOT been processed in INSIGHT, the option to Refund to Funder will be unavailable.
5. Select Next.
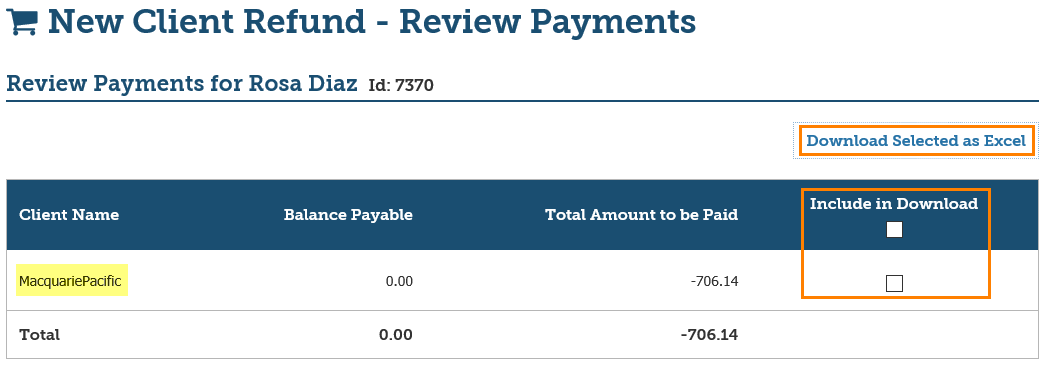
6. (If applicable) Download the Payment Summary by selecting the checkbox for Include in Download and select Download Selected as Excel.
NOTE: As the refund is being paid to the Funder, the Client Name has been updated to display the Funder’s name instead.
7. Select Next.
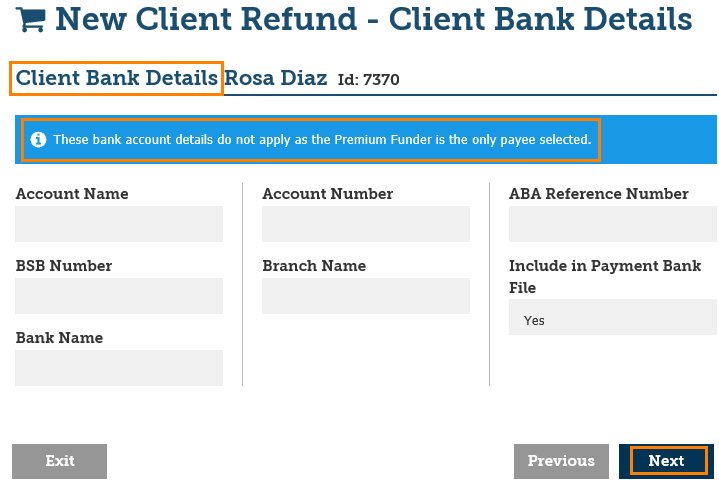
(Australia Only) The Client Bank Details section does not apply as the refund is being paid to the Funder – Select Next to proceed to the following page. There will be a message that displays as: ‘These bank account details do not apply as the Premium Funder is the only payee selected.’
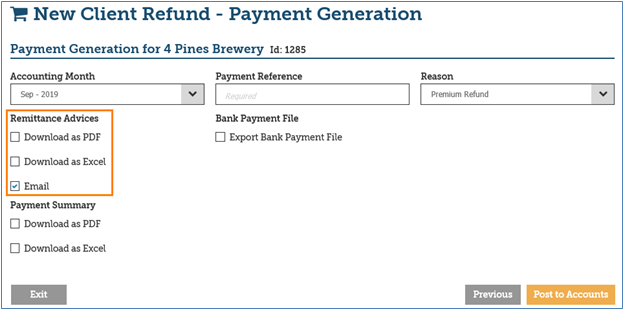
8. Enter a Payment Refereance and a Reason.
9. Select the desired options for Remittance Advises, Payment Summary and Bank Payment File.
10. Select Post to Accounts and Yes to the confirmation messages.
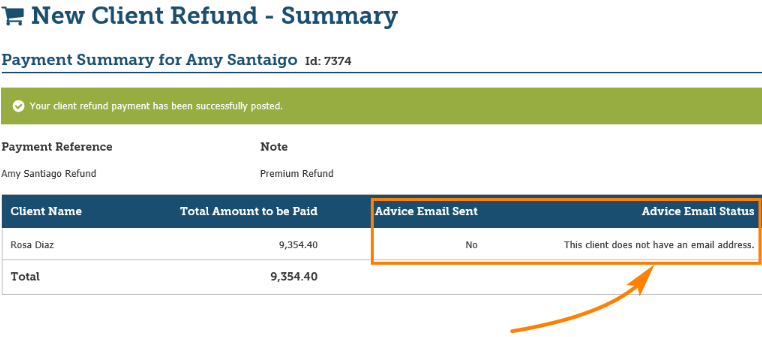
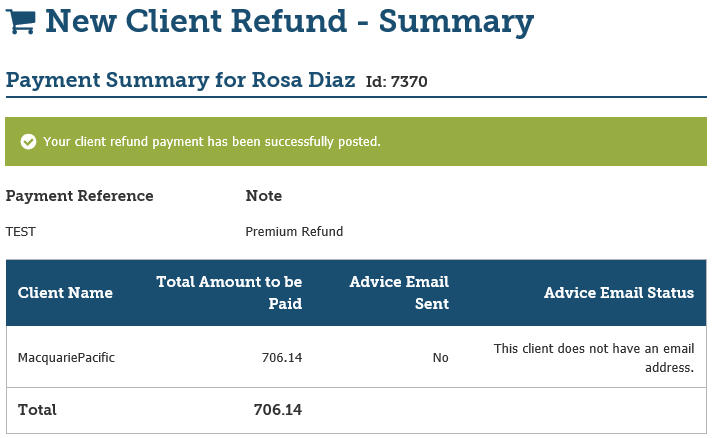
11. Review the Summary page.
 NOTE: If the remittance was not successfully emailed, the Summary will display the Advice Email Sent and the Advice Email Status.
12. Select Finish to exit the Wizard or Make Another Payment to return to the beginning of the Wizard.
Troubleshooting |
No payment appearing in Export Payment Bank File
| This troubleshooting item is when payments are not appearing as expected in Export Payment Bank File selections. | 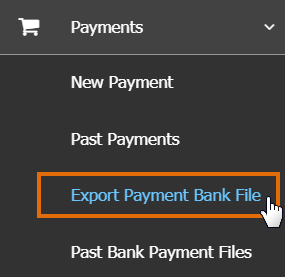 |
In order for a payment to be available for an export payment, the following needs to be in place:
1. The ledger setting needs to show Client Bank Details.

2. The Client Profile needs to have both bank details entered, and the Include in Payment Bank File selected as Yes.
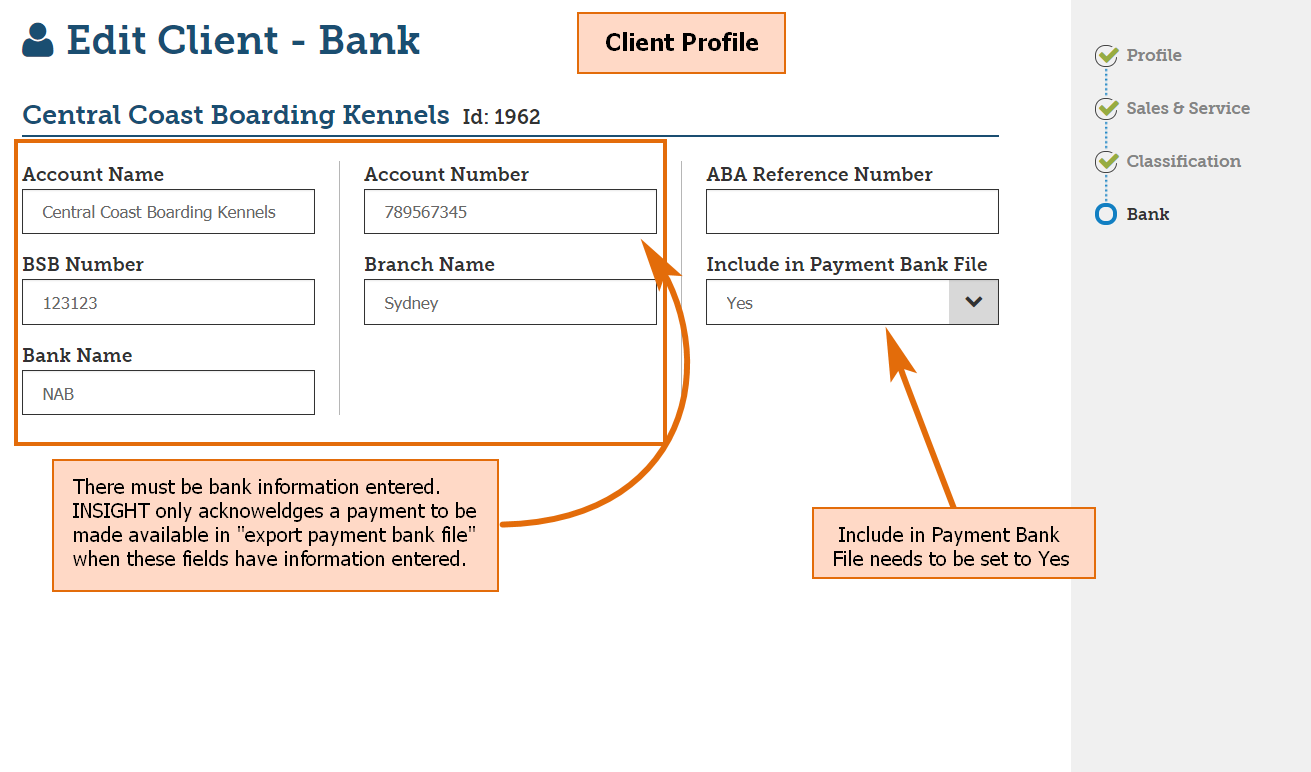
The reason that payments will not appear in the Export Bank Payment File list is that INSIGHT firstly looks at the bank information against the client profile. When there is none showing, INSIGHT does not acknowledge the client is able to receive the payment via bank file.
3. Within the Payment Wizard, ensure you are saying Yes to Include in Payment Bank File.

4. From the Payment Generation page, if you are wanting to make the payment available to “batch” with other payments for one ABA file, do NOT select Bank Payment File on this page of the Wizard
What’s New?Version 1.4
Version 1.03
Version 1.02
Version 1.01
Version 1.00
|
Was this article helpful?
That’s Great!
Thank you for your feedback
Sorry! We couldn't be helpful
Thank you for your feedback
Feedback sent
We appreciate your effort and will try to fix the article